Friday, 20 September 2013

How To Remove MICRO SD Memory Card Password Read Here Top 4 Solutions

Solution 1:
For Symbian Mobiles:
1. Download and Install FExplorer
2. Insert your card into your phone, without accessing it through the phone
3. Run FExplorer and Open the path C:\system
4. Find the file called mmcstore, and rename it mmcstore.txt
5. Copy that file (mmcstore.txt) to your PC and open it in Notepad
6. Your password will be located within that file.
Solution 2:
For Symbian Mobiles:
1. Download and Instal X-Plore
2. Now open the X-Plore and press Zero(0) then check you have marked the
"Show the System Files".
3. After you done the above step now go to the file:
C:/Sys/Data/Mmcstore
4. If you found the above path then press the option "3" to set the Hex-Viewer.
5. Now look the third column you can see the code like ! TMSD02G (c ??”? x???3?3?3?3?3)
Now see the characters between '?' because it is your password 33333.
6. You mayn't able to access the path file:
C:/Sys/Data/Mmcstore
If you don't set the password for the memory card.
Solution 3:
For Micro SD:
Put the card in any E series mobile or N95 etc and format it.
It will not ask for a password.
Solution 4:
1. Go to file manager on your mobile
2. In Settings choose system folders,
3. In the System folder, find a file called mmcstore
4. Send the file to your PC using IR/Bluetooth
5. Open the file in Notepad
6. The password you need for your memory card is located within that file
**How to disable CMD in any system**

1. press Win+R (RUN), type gpedit.msc and Ok.

2. In Group Policy browse to "USER CONFIGURATION / ADMINISTRATIVE TEMPLATES" and highlight the Systems Folder

3. Double click, "Prevent access to the command prompt."

4. Change settings to 'Enable' and click 'ok'

***Increase your RAM + Speed up your PC (NEW TRICK) ***
First go to Setting then Control Panel then Administrative Tools then services
Setting\Control Panel\Administrative Tools\services

here you see a lot of services. you have to Disable all below services
For Disabling Double Click on the service
you will see "Startup Type" in which three option
1 Automatic
2 Manual
3 Disable
Select Disable

The Services are
Alter
Clipbook
Human Interface Access Devices
Indexing Services
Messenger
Net Logon
Net Meeting Remote Desktop Sharing
Remote Desktop Help Session Manager
Remote Producer Call LOcator
Remote Rigistery
Routing & Remote Access
SSDP Discovery Service
TCP/IP NetBIOS Helper
Telnet
Upload Manager
Windows Time
Wirless Zero Configration

All of these Servicess not often used and Computer ram
spend its a lot of portion to run thease servicess
so Disable all thesse sevicess and increase your ram as well as your speed


2

go to run and type prefetch then enter
a window will open delete all the file in it ..........dont worry its only extention files it not may hurt your Pc

go to run and type temp then enter
a window will open delete all the file in it ..........dont worry its onlytemporary files it not may hurt your Pc

go to run and type %temp% then enter
a window will open delete all the file in it ..........dont worry its only temporary files it not may hurt your Pc


3

go to run and type regedit then enter then follow the path
HKEY_LOCAL_MACHINE\SYSTEM\CurrentControlSet\Contro l
just click on Control in right side you will see a key WaitToKillServiceTimeout change its value 7000 to 1000

Restart your PC and dont forget to comments

How to delete UN deleteable virus file ?

1] Open Notepad.exe

2] Click File>Save As..>

3] locate the folder where ur UN deletable file is

4] Choose ‘All files’ from the file type box

5] click once on the file u wanna delete so its name appears in the ‘file name’ box

6] put a ” at the start and end of the file name
(the file name should have the extension of the UN deletable file so it will overwrite it)


7] Click save,

It should ask u to overwrite the existing file, choose yes and u can delete it as normal
WiFi Sector Antenna How to Tutorial

On this page you will find information on how Pe2eR builds a sector antenna for de Wifi 2,4GHz ISM band.
The design was published by Dragoslav Dobričić, YU1AW.
Most of his work is in Serbian, but Dragoslav and Pe2eR have corresponded in English. they differ a little about the dimensions of Dragoslav AMOS antenna. When Pe2eR build the antenna as Dragoslav describes, it usually has best VSWR below the Wifi band, so Pe2eR shortened it a little.
So now this antenna is suitable for use in Computer Radio LANs conforming to the IEEE 802.11b/g standard – better known as Wifi. It can be used on an a La fonera Router or Wifi client with equal benefits.

The properties
Frequency: 2,4 to 2,5GHz
Impedance: 50 Ohm @ 2,45GHz
VSWR: < 1:1,5
Polarisatie: Verticaal
Gain: 11dBi
Vertical beamwidth: (-3dB) 15º
Horizontal beamwidth: (-3dB) 125º
Connector: Female-N type (50 Ohm)

Principe
The antenna is a centre-fed broadside array antenna, based on the Franklin Antenna as published in Rothammels Antennebuch (shown below)

 
uilding the antenna step-by-step.
Make a hardcopy of the Autocad drawing (the antenna is drawn to scale 1:1).

Use 292.2mm of approximately 1.8mm diameter copper wire for each radiator. Stretch wire (to straighten it). This wire is commonly used in Dutch house wiring. Put the wire along the linear scale on the drawing and mark it as shown (I use a permanent CD-ROM marker)

 
Next, prepare 4 pieces of PE studs. Use the insulator from RG-213 – like cable. Each stud is 15mm long. Drill a 2mm hole 10mm from the end.
 
For the reflector, use 495x62mm of Copper-clad circuit board. Copper side must be on the same side as the radiator (Pe2eR used double-sided PCB).

Drill a hole in the center to accept your N-Type connector. Pe2eR used one that comes with rigid coax attached. The shield of the coax should extend to 28mm above the surface of the PCB. The centre conductor must extend 5mm more. Drill 4 holes to attach the studs to the reflector.

Bend the two radiators. Do not forget to slide on the PE studs before bending. Remember: It is the amount of wire you use that is important, not the final dimensions after bending!

 
Fabricate the 1:4 BALUN from ½ wavelength of coax (measured by the shielding).

RG-316 (v=0,697): 43mm (This is the coax cable I use here)

RG-58 (v=0,66): 40,7mm

CFD200 (v=0,83): 51mm


 “Verbindingen KORT houden” means “keep connections SHORT as possible”.
Solder the radiator to the coax feed/ BALUN. 

 
used S-Lon 65mm mini PVC rain gutter to house the sector antenna. Pe2eR is sure that this is not available all over the world, so you need to find something similar.
continued...!! 


And the final mounting of the antenna's must be something like this:
Continued...!!

End...!!!

20Tips & Tricks in one Place for Desktop!! just see once
1.Creating a New E-Mail Shortcut:-
To create a shortcut that will open your default e-mail program starting a new e-mail, Right click on an open area of the desktop
Select New / Shortcut
For the Command Line, enter mailto:
For the title enter something like New E-Mail
When you click on this your default e-mail program should start with a new e-mail form.
===================================

2.Creating 3D Window Effect:-

You can create a nice 3D effect for your windows Start Regedit
Go to HKEY_CURRENT_USER \ Control Panel \ Colors
Make sure the following setting are there:
ButtonHilight=128 128 128
ButtonShadow=255 255 255
=========================================

3.Creating Shhuutdown, Restart and Logoff Icons:-

To create the icons, create a shortcut on the desktop. For ****down, the command is C:\WINDOWS\RUNDLL.EXE user.exe,exitwindows
For Restart, the command is C:\WINDOWS\RUNDLL.EXE user.exe,exitwindow***ec
For Logoff, the command is C:\WINDOWS\RUNDLL.EXE shell32.dll,SHExitWindow*** 0
==============================================

4.Having your Favorites and Start Menus Sort Alphabetically:-

If your Start Menu Program or Favorites are not sorting alphabetically, it is easy to fix this: Start Regedit
Go to HKEY_CURRENT_USER/Software/Microsoft/Windows/CurrentVersion/Explorer/MenuOrder
Under here is are Favorites and Start Menu folders
In each there is a value called Order
Simply delete (or rename this) and restart Winodws
Your Favorites or Start Menus should now sort alphabetically
===========================================

5.Increasing the Icon Cache:-

Run Regedit
Go to HKEY_LOCAL_MACHINE\Software\Microsoft\Windows\Curr entVersion\explorer
Create a new string called Max Cached Icons
Give it a value of 10000
This will increase response time in windows and give the Shellicon cache file more elbow room
===================================

6.Make Icons 256 Color 16-Bit:-

Open the Registry
Hit Ctrl+F
Type Shell Icon BPP
When found, right click the Shell Icon BPP icon
Click Modify
Change the value from 4 to 16
Click Ok
Close the registry
Restart your computer
===================================

7.Removing Shortcut Arrows:-

An easy way to remove those irritating arrows from your desktop shortcut icons and not change their properties Right click the Desktop / Properties / Appearance tab
Select Item
Scroll for Icon
The default size is 32
Change this to 30
Clicking Apply
========================================

8.Adding the Control Panel to the Start Menu:-

Open up the Explorer
Go to \WINDOWS\Start Menu
Right click in the right-hand panel
Add a new folder
Name it Control Panel.{21ec2020-3aea-1069-a2dd-08002b30309d}
This makes getting to the Control Panel items a little easier
======================================

9.Making Desktop Changes Permanent:-

To make changes to the Desktop like window size, positon after rebooting: Start Regedit
Go to HKEY_CURRENT_USER\Software\Microsoft\Windows\Curre ntVersion\Policies\Explorer
Create a New Binary Value
Name it NoSaveSettings
Give it a value of 01 00 00 00
============================

10.Changing a Folder's Icon:-

To change the icon of a Folder on desktop: Using the Explorer, move the folder from the Desktop directory to another directory on the hard drive
Right click on the new folder and select "Create Shortcut"
Move the shortcut to the Desktop
Right click and select a new icon
==========================

11.Full Window Drag ( Without Plus! )

Start Regedit
Open HKEY_CURRENT_USER /ControlPanel /Desktop /DragFullWindows
On "DragFullWindows" properties change 0 to 1
========================================

12.Getting Screen Shots:-

If you need to get a screen shot, and you do not have a screen capture program, try this: Hit the Print Screen key. This copies a bitmap of the full screen into the Windows clipboard. Start up a graphics editor and paste it in.
Alt + Print Screen will capture only the active window.
========================================

13.Increasing the Size of the Scroll Bar:-

How to adjust the width of the scroll bar:
Select Properties
Select the Appearance tab
Go to the item list and find scrollbar.
Increasing the value in the Size field will increase the scrollbar width.
========================================

14.Customizing Individual Folder Icons:-

To change a folder's icon: Open Notepad and enter two lines,
[.ShellClassInfo]
IconFile=file name,number
(e.g. IconFile=C:\Icon\CustomFolder.ico,0)
Save the file as DESKTOP.INI in the folder you wish to change.
Click Start -> Run, type in the command line,
ATTRIB +S "folder name"
(e.g. ATTRIB +S "C:\Custom Folder")
Open Explorer or My Computer and refresh (press F5 key).
This tip only work Windows 95/NT 4.0 + IE 4.0 with shell integration, or Windows 98/NT 5.0.
========================================

15.Removing the Recycle Bin:-

To remove Recycle Bin from the desktop: Run REGEDIT.
Find NAMESPACE key in left pane (HKEY_Local_Macine \ Software \ Microsoft \ Windows \ Current Version \ Explorer \ Desktop \ Namespace)
Expand NAMESPACE (click '+' box)
Delete the value RECYCLE BIN in right pane
========================================

16.Adding Send To the Recycle Bin:-

Add a SHORTCUT TO THE RECYCLE BIN in your SEND TO folder. That way you can just right click on a file you want to delete, and send it to the recycle bin without having to confirm each time.
========================================

17.Having Icons with No Name:-

Normally you have to have a name for an icon, just spaces are not allowed.
To create an icon with no name attached: Make sure NumLock is on
Highlight the Icon you want to change
Right-Mouse click and select Rename
While holding down the Alt key, type 0160
Now the icon will have no name below it.
To Create Multiple Icons with No Name - From John R.
Follow directions detailed above
With the second icon simply add one space-bar character AFTER the 0160 number.
Each successive icon gets an additional space-bar character at the end (to prevent a duplicate naming error).
========================================

18.Moving the Start Button:-

How to move or close the start button! Click on the Start button
Press the Esc key
Press the Alt and the - keys together
This will give you a menu, you can move or close
But if you move it you need to use the arrow keys and not the mouse.
========================================

19.Aligning Drop-Down Menus to the Right:-

All dropdown menus can be aligned to the right.
This features becomes useful when trying to access
menus with submenus that appear directly to the right.
Open the Registory editor (e.g. regedit.exe)
Goto \\HKEY_CURRENT_USER\Control Panel\Desktop
Create a string entry called "MenuDropAlignment"
Set its value to 1
Reboot
Note: Will not work under NT 4.0.
========================================

20.Changing Drive Icons:-

To change a drive's icon when you open My Computer Create a file called AUTORUN.INF on the root of your hard drive
Enter the lines
[autorun]
ICON=Name of the ICON file
For the name of the icon file you can either specify the path and name (e.g. ICON=C:\WINDOWS\ICONS\MY_ICON.ICO) or
a specific icon in a library (e.g. ICON=ICONFILE.DLL,2
========================================
How To Remove "Autorun.inf " ...

Autorun.inf can be the big virus.You can’t delete it.When you insert pen drive and contains the file autorun.inf. then it will automatically run it self.may be you have not observe any danger in that.but sometime this file contains some harmful code.It can be very ... dangerous for your system.Normally * there is no software to delete this file from your computer.But now you can delete it using command prompt.
.
Simply follow this trick...
.
Step 1:- Run command prompt as administrator.

Step 2:- Go to root directory using cd or cd/ command.

Step 3:- Now type “attrib -h -r -s autorun.inf” and press enter.
It will search for autorun.inf file inyour computer.

Step 4:- Now you will have results if there is file or not
if you find result of this file then type del autorun.inf & press
Enter. This will delete autorun.inf from your computer.

Step 5:- finally..Restart *your Computer

Download Youtube Videos in a Click!!! without software

Simply add before youtube pwn and download your videos

Thursday, 19 September 2013

Install Windows XP From USB in a simple way!!!

I became mad because I was looking for something very easy to use that just take seconds to do what I want. This software exist! it's Rufus! Rufus can make a bootable usb disk using MS-DOS stored in the system or using a system ISO. You can create Windows XP, Windows 7 or Linux boot disk very easily!

Screen Shot... 
Name:  rufus.png
Views: 975
Size:  33.6 KB 

These are the steps to follow!

*Download rufus from here Download

 *Plug in your USB Flash drive
*to make a Windows bootdisk (Windows XP/7) select NTFS as file system
*then click on the buttons that looks like a DVD drive, that one near to the checkbox that says "Create bootable disk usng:"
*Choose the XP ISO
*Click Start
Done!
Enjoy

Porn site block Tricks

To Block Porn Sites Inter These DNS into your Local Area network

Preferred DNS:208.67.222.123
Alternate DNS:208.67.220.123

How to Remove Printer from Registery


Edit: If you just want to remove the default printer you can:

    Login as a local admin
    Start -> Run -> regedit
    Click HKEY_USERS
    File, Load Hive, browse to 

    C:\Documents and Settings\Default User\ and select NTUSER.DAT
    Specify "DU" if prompted for a name
    Browse to HKEY_USERS\DU\Software\Microsoft\Windows NT\CurrentVersion\Windows
    Look for a key named "Device" of type REG_SZ
    Double-click that key, remove the data, press Ok
    Browse back to HKEY_USERS\DU, click the File menu, Unload Hive

Monday, 15 July 2013

Shutdown Computer Automatically with scheduled Task

How To Automatically Shut Down Your Windows XP Computer

It’s been said, “Not owning a computer is the most secure computer.” While that’s true, we need to take steps to keep our computer secure.
As a general rule, I like to shut my computer off when I’m away from it for long periods of time. That includes going out for the day or night, as well as going to sleep. Sometimes it’s hard to remember to shut it off. So in this article I’ll show you a way to shut your Windows XP computer off automatically.
Windows XP comes with a program called shutdown.exe and is located in your system32 folder which typically resides under C:\Windows or the main folder where Windows XP was installed.
So let’s set this up quickly:
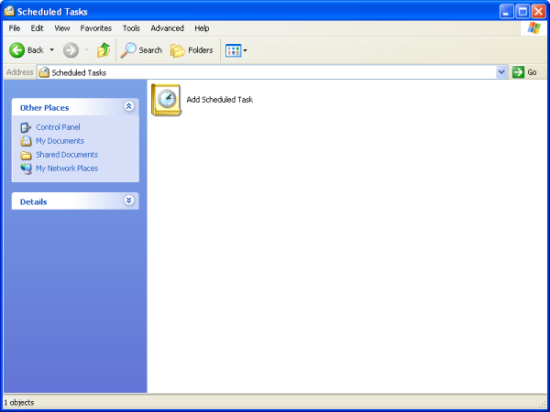
1. Go to “Start->Control Panel” and click on “Scheduled Tasks” if you’re in “Classic View”. If you’re not in “Classic View” you are probably in “Category View”. In “Category View” you’ll click on “Performance and Maintenance”. Then click on “Scheduled Tasks”. You’ll see the following screen. Double-click the “Add Scheduled Task” icon.
Scheduled Tasks
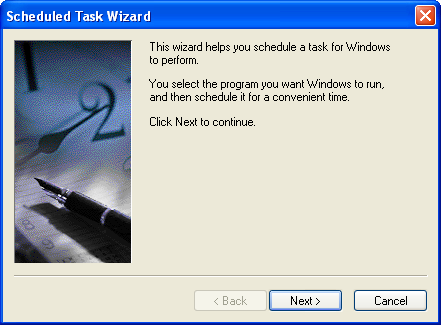
2. Click “Next” on the “Schedule Task Wizard” screen (below).
Windows XP Schedule a Task Wizard
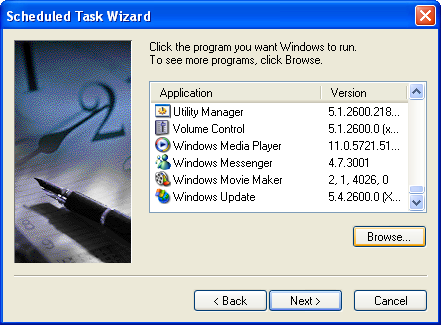
3. Click the “Browse” button on the next screen that lists the different applications you can select from (below).
Windows XP Schedule a Task Wizard
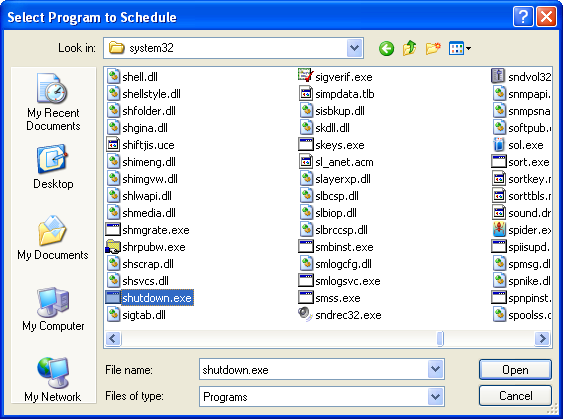
4. Browse to C:\Windows\system32 and select the program shutdown.exe (below).
Windows XP Schedule a Task Wizard
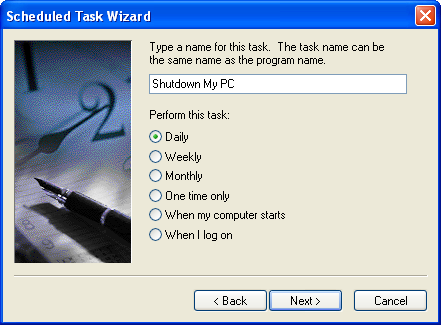
5. After selecting shutdown.exe, select “Daily” for “Perform this task:” (below).
Windows XP Schedule a Task Wizard
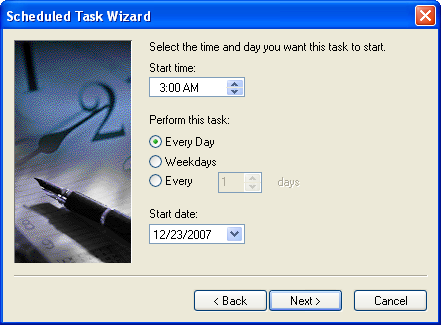
6. I sleep during the night. That’s why I shut my PC down automagically at 3:00am (below). But, I run some jobs automatically at 1:00am – virus scan and spyware scan, which will be part of a future article. Feel free to adjust this time to fit your schedule.
Windows XP Schedule a Task Wizard
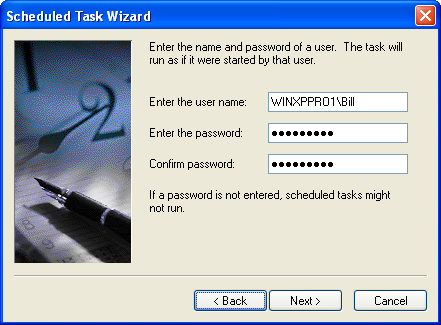
7. You’ll be asked to provide a user name and password that will be used to run this task (below). Warning: If you don’t know your password, that ok. You can add or change it later. If you don’t provide the correct password, you’ll get an error screen after this step. However, you’ll still be able to finish this process.
Windows XP Schedule a Task Wizard
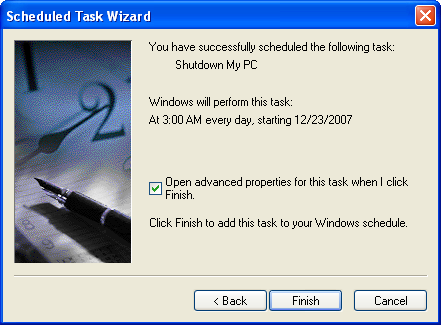
8. At this point you’ve successfully added a new schedule task to run at 3:00am. However, let’s click on the “Open advanced properties fro this task when I click Finish” checkbox and click “Finish” so we can add some command line parameters to shutdown.exe (below).
Windows XP Schedule a Task Wizard
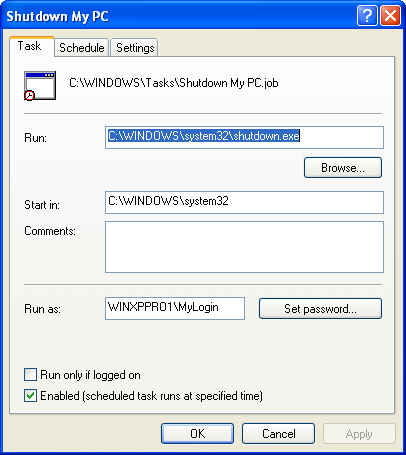
9. You’ll be presented with the following screen.
Windows XP Schedule a Task Wizard
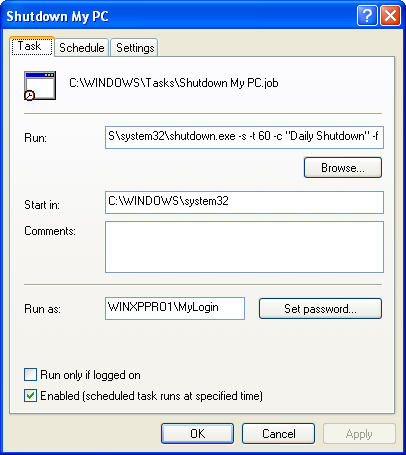
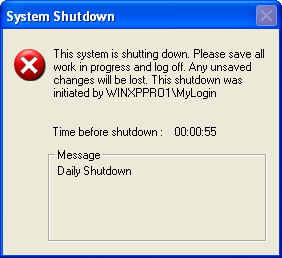
10. Add the following command line parameters as seen below and here – C:\Windows\system32\shutdown.exe -s -t 60 -c “Daily Shutdown” -f. The -s stands for “Shutdown the computer”. The -t 60 stands for “Set timeout for shudown to xx seconds. Feel free to adjust that. You never know when you’re going to be working at 3:00am, so it’s nice to have 60 seconds to prepare for the shutdown. The -c stands “Shutdown comment” which shows up on the screen when the PC is shutting down. And finally the -f stands for “Forces running applications to close without warning”.
Windows XP Schedule a Task Wizard
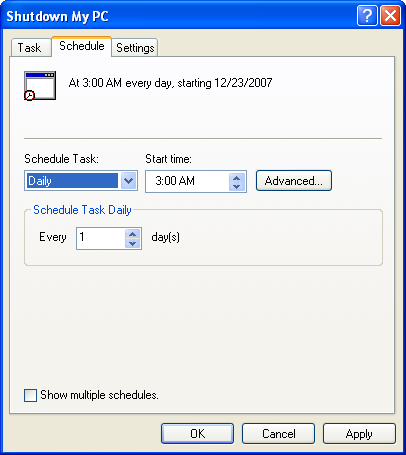
11. There’s nothing to change on “Schedule” tab. However, feel free to adjust anything that pertains to your work environment or routine.
Windows XP Schedule a Task Wizard
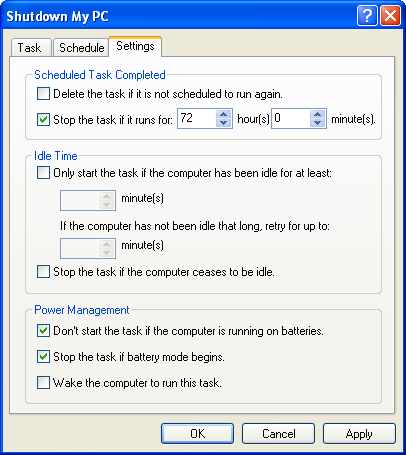
12. I also leave the “Settings” tab alone. Again, change what you need to or experiment what suits your work style.
Windows XP Schedule a Task Wizard
13. This is the final screen (below) that pops up when the task runs. You will have 60 seconds to close applications if you need to.
Windows XP Schedule a Task Wizard
That’s it!! Now you can rest assured your PC is shut down and secure while you’re away from your PC.

Tuesday, 9 July 2013

How To Create MultiBoot USB Flash Drive (Windows 7 And XP)


Required things:
1. A USB flash drive with a minimum of 4 GB space
2. Windows 7 installation DVD
3. Windows XP installation CD/DVD


DownloadWin setup from usbselect Run as 
 administrator'' option.


A. Make sure that your USB flash drive is selected in the first box
B. Under Boot Options, select XP/BartPE bootable [NTLDR]
C. Under File System and OverRides section, select Boot as HDD (C:2PNST), and NTFS options
D. Select File –> USB option in Image Tools box
Last Prepare Drive Button Py Click when Message Show Click Ok button. Next Screen and Ok Button Click


8. Go button Click and wait for completing installation.


Sunday, 21 April 2013

Use Keyboard with mouse
If you feel that your external keyboard is not working properly or some particular key is not functioning then you can use internal keyboard on your desktop screen. This property of keyboard is found in windows xp and seven. Just follow these steps
Go to start menu and press “run
Type  “osk
Now press enter.
(note. Don’t use commas)
you will see keyboard on your desktop screen. Now use mouse to click on keys for operation.

Computer Tips

Use Keyboard with mouse
If you feel that your external keyboard is not working properly or some particular key is not functioning then you can use internal keyboard on your desktop screen. This property of keyboard is found in windows xp and seven. Just follow these steps
Go to start menu and press “run
Type  “osk
Now press enter.
(note. Don’t use commas)
you will see keyboard on your desktop screen. Now use mouse to click on keys for operation.


INCREASE SPEED OF HARD DISK
It is common observation that some times our computer slows down due to low performance of hard drive. This problem happens due to the slow performance or poor speed of hard drive. When we say about poor performance, actually we mean, poor speed of reading/writing of hard drive. This problem can be solved by increasing the hard drive speed. Follow these steps to solve your problem.


Click Start menu and select run.
Now type (sysedit.exe) in run and press enter.
System configuration editor will appear.
Here you can see some multiple windows but you will select (system.ini).
This window contains a line (386enh)
Now after this line type (irq14=4096)
Now close this window and save it.
Reboot your computer now.
You will surely feel better performance of your computer.
Enjoy.
In this post I will tell you about installation of win XP in minimum time period. Normally when someone tries to install windows XP on computer, it takes around 30-40 min to complete entire setup. It is too much time to install windows setup. I will tell you a method to install windows more faster. It will take approximately 15 minutes to complete windows installation. So to install win XP in short time please follow these steps.

Power on your computer and start with bootable windows XP cd
In first step window will load installation files.
Select any drive ( C: ) for installation.
Select NTFS to format the partition.
Setup will copy files on this drive and it will try to restart PC.
After restarting when you see Xp logo, press (Shift+F10).
It will open (CMD) prompt.
In CMD prompt type (Taskmgr)
It will open task manager. Now go to “process” tab and find “Setup exe” Right click on setup.exe and select “Set priority”
You will see a submenu. Here priority will be normal. Select priority to (High)  or above (Normal).
Done. 

This will complete installation process much faster than the normal original time.
Try it….......
 

Friday, 19 April 2013

Top 10 facebook Apps to use


The top ten facebook apps

Facebook,Facebook and Facebook.......
Everybody now a days have a facebook account these day ..facebook is connecting everyone these day.Its has increased our social presence .So as from the title  it is clear that on what topic my post is goin to be. The Facebook Applications..Now a days to make our social presence better we have to use various application..These apps if used in a good way can make our social life very easier....

So now coming  straight to the topic these apps are on the top.they are used globally use them and make your life easier :)


TOP TEN FACEBBOK APPLICATIONS

1.

Farmvile

FarmVille is a real-time farm simulation game developed by Zynga, available as an application on the social-networking website Facebook and as an App on the Apple iPhone. The game allows members of Facebook to manage a virtual farm by planting, growing and harvesting virtual crops and trees, and raising livestock.

The top ten facebook apps
Mafia Wars is a multiplayer browser game created by Zynga. It was the 2009 Webby Award People’s Voice Winner in the Games category. It is available on several social networking sites and on the iPhone.

3.Static FBML

The top ten facebook apps

Add advanced functionality to your Page using the Facebook Static FBML application. This application will add a box to your Page in which you can render HTML or FBML (Facebook Markup Language) for enhanced Page customization.
The top ten facebook apps

This application helps you to connect Twitter with your facebook account. Thus it is a really time saving and profitable application for those internet surfers who are users of both Twitter and Facebook.
The top ten facebook apps
Bejeweled is a puzzle game by PopCap Games, first developed for browsers in 2001. Three follow-ups to this game have been released by Popcap Games. Blitz is a one minute timed version which can be played by linking to Facebook, or in an offline mode. More than 25 million copies of Bejeweled has been sold and has been downloaded more than 150 million times.

The top ten facebook apps

Scrabble is a word game in which two to four players score points by forming words from individual lettered tiles on a game board marked with a 15-by-15 grid. The words are formed across and down in crossword fashion and must appear in a standard dictionary. Official reference works (e.g. The Official Scrabble Players Dictionary) provide a list of permissible words. The Collins Scrabble checker can also be used to check if a word is allowed.
The top ten facebook apps

Pet Society is an internet social game developed by Playfish. The game, which is launched within Facebook, has been ranked as the most popular Facebook application. New players custom design their pets, choosing genders, names, colors, and features (such as; ears, nose, mouth etc.)
The top ten facebook apps

Create and raise a happy pet in Pet Society! Play games, decorate your house and bring gifts to your friends’ pets when you visit them. Raise your pet and enjoy many activities together – racing, fishing, gardening, cooking and even treasure hunting! Make your pet happy by earning coins to shop and buy stylish clothing and cool furniture. In the world of Pet Society, it’s non stop fun for you and your pet!


This is an interesting one. Now a days I m also playing this game ..Very interesting 
recommended 

.Join  the thousands of people already playing this popular multi-player billiard 


game. Play with your friends and other online opponents from around the 


world. Collect trophies for your best pool shots!

The top ten facebook apps